Part 3: Starting with the cluster
As mentioned in my last post, I did a bit more shopping 😄 Here’s what landed in my cart:
- 3 additional SD cards with 64 GB (32 GB would probably have been enough, but better safe than sorry)
- Ethernet cables, power supply for the Zeros & a network switch
Now the setup can finally begin — for real this time 🎉
Step 1: Getting the OS on all SD cards
So far, I’ve just been playing around, getting a feel for my Pis. But now — things are getting serious!
That means installing the right version of Raspberry Pi OS on all SD cards. Since the Zeros have limited resources, I’m going with the Lite version — which also means a headless setup. No desktop environment, just SSH. Should be fine (I hope ;)). Given Kubernetes components and many container images are optimized for 64-bit, I am using this version across all devices.
Each Zero gets its own hostname — worker1, worker2, and worker3. The Pi 4 will be named cp, since it’ll act as the control plane in my cluster.
For the very first start, I’m enabling WiFi to keep things simple. Later on, I’ll switch to a wired connection — especially since I want the setup to be as stable as possible for the conference talk. Flaky WiFi is the last thing I need on stage.
Preparing each Pi
Before diving into the cluster setup, I double-checked a few things — and ChatGPT recommended disabling swap. I’m not entirely sure if it’s strictly necessary (its reasoning: “Swap is slow, unreliable for workloads, and must be disabled to run Kubernetes or k3s”), but hey, let’s play it safe and give it a go.
So basically these are the steps to prepare each Pi after one another:
SSH into it:
ssh verenatraub@cp.local # with @worker1.local ... for the others
Check if swap is enabled:
free -h
If swap shows 0 GB, I am cool. But I am not on all devices, so I got rid of swap by running:
sudo dphys-swapfile swapoff
sudo systemctl disable dphys-swapfile
And then finally: Updating packages etc.:
sudo apt update && sudo apt full-upgrade -y
Get the control plane working
All set now for getting Kubernetes into the picture - again in the lightweight k3s distribution.
I’m starting with the control plane (for now my Pi 4) and installing it by
curl -sfL https://get.k3s.io | sh -
of course forgetting that I need to adapt the cgroups as described in my post from Friday 🙈. Once fixed, the control plane is up :)
Adding the Zeros as worker nodes
In order to add the Zeros as worker nodes to the cluster, I need the node token by running
sudo cat /var/lib/rancher/k3s/server/node-token
on the control plane.
This token is needed because of how k3s works: the control plane manages the cluster, while additional nodes (so my Zeros) join as agents. Each agent uses the token to authenticate with the control plane.
Having the token, I can install k3s with the following, adapted command:
curl -sfL https://get.k3s.io | K3S_URL=https://<CONTROL PLANE IP>:6443 \
 K3S_TOKEN=<MY NODE TOKEN> \
 sh -
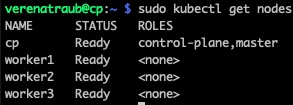
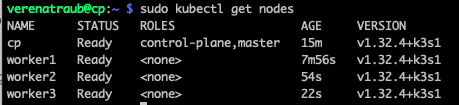
After repeating the setup steps for all Zeros, my control plane now shows all nodes 🎉
BUT:
- My Zeros don’t have any role assigned (I was hoping for something like worker).
- When checking from the control plane, I can see the full overview from above, but when trying to run commands directly on the workers, I get an authentication error:

After sneaking a bit into this I found out: this is actually normal aka expected with k3s. Why?
- Only the control plane node has kubectl preconfigured and access to the cluster credentials. I could copy the kubeconfig and use it manually on the workers. But for now, I’m fine just interacting from the control plane. Maybe something to optimize later.
- By default, k3s doesn’t assign a node-role label to workers. So if I need a label, I would need to add one manually by running e.g.
sudo kubectl label node worker1 node-role.kubernetes.io/worker=worker
Deploying nginx as demo
As last week, first test is again to install & expose nginx by running
sudo kubectl create deployment nginx --image=nginx
sudo kubectl expose deployment nginx --port=80 --type=NodePort
Again it successfully shows me the default nginx page. I was curious to see which of my worker nodes the pod ended up on… and was surprised to find it running on the control plane. So, another learning: k3s also allows workloads on the control plane. That’s fine, but lets face it: To keep things more realistic and use my resources better, it makes more sense to run workloads on the actual worker nodes.
For this, the follwing steps were necessary:
Taint the control plane manually
sudo kubectl taint nodes cp node-role.kubernetes.io/control-plane=:NoSchedule
ensures that only system Pods (or those with the right toleration) can run on my control plane aka Pi 4.
Reschedule the nginx pod
By simply running
sudo kubectl delete pod <nginx-pod-name>
And there we have my nginx Pod running on worker2 🎉
